![]()
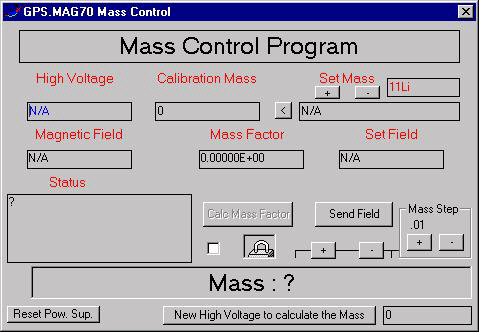
| Open the Isolde Controls file in the Isolde Control System directory.Choose the Mass Control tool GPS.MAG70 Mass Control will appear: |

| First, set the mass of the isotope you want to have in the Set Mass dialog box. Let us suppose that you have chosen 132Xe (xenon 132). | |
| Press the Send Field button. In the Set Mass dialog box you will see the value of the mass you wanted to set with higher precision, in our example something like 132.90414... | |
| You will read the values for the High Voltage, the Magnetic field and the Set field in the corresponding boxes. | |
| To be able to calibrate the magnet, you will have to adjust the value of the magnetic field. So, open the Magnet System GPS.MAG70. | |
| You will also need to open the Faraday Cup GPS.FC490 . | |
| Open the Beam Scanner GPS.SC482 to view the shape of the beam. | |
| Finally, open the Wire Grid tool GPS.WG475 and press the Grid button. | |
| Change the value of the magnetic field with GPS.MAG70 until you have reached the maximum current value in the Faraday Cup GPS.FC490. | |
| Once you have thus adjusted the value of the magnetic field make sure that the mass shown in the "Calibration Mass" field corresponds to the actual isotope (if needed enter the isotop name again into the "Set Mass" field and press the "<" button). | |
| Then press the little white square at the left side of the key image under the Calc. Mass Factor button on the GPS.MAG70 Mass Control tool and press the Calc. Mass Factor button. The computer will calculate the value of the Mass Factor, write it in the corresponding box and you will be able to see the correct value of the mass, in our example, Mass: 132,90414... |
| Back to top |
![]()